Category Archives: Make it your self

Saving money, living better, being green.

Ok so I have been thinking a lot about our budget lately, and looking at the “average” budgets most others have. I am trying to figure out where people get their numbers! Comparing our budget for a 3.5 person house to the national average is eye-opening.

Where we spend:

Food

We spend 18% of our income on food. We do this because it costs more money to eat organic whole foods. There is really no getting around that. By increasing the quality of what we eat we save in other areas of our life. My husband was missing a lot of work because of health problems before switching our diet. He is out of work 3-5 days less a month than he was before the switch saving us his PTO time and the salary cut he had to take when he ran out of PTO.

We spend less on doctors visits because of our diet changes as well.

Healthcare

Our insurance is subsidized through Mikes work, so we “only” pay about $400 a month for insurance. We do get the good insurance though (an extra $60 a month) so we can take advantage of the alternative care. I get masages almost every week for prenatal/post natal care and health maintenance. Mike and I take full advantage of the Chiropractor/Acupuncture benefits as well. I wish I could say we used a Natropath instead of a MD but there are no ND’s in our area who accept insurance and we don’t have the money to pay out-of-pocket and hope for reimbursement from the insurance company. I have found a holistic MD that I think I like though. We have a FSA so our co-pays are at least paid with tax-free money. It is helping a lot too with the hospital and midwife payments for the pregnancy. Too bad they are changing the way FSAs work starting next year due to the new health care legislation. Maybe we will get lucky and our insurance rates will drop?

Where we save:

Cleaning products

We have made our last big market cleaning product purchase. From here on out we make our own house hold cleaners, bathroom cleaners, kitchen cleaners, laundry detergent AND dish washer soap! I am terrified of the dish washer soap, that is one we have not switched yet I just stocked up on my favorite out of fear, but when we run out I am making our own! Mark my words! Instead of spending an average of $30 a month on cleaning products we will be spending an average of $14 about every 3 months on vinegar, baking soda, borax, and Dr. Bonner’s soap.

By switching to home-made, natural cleaning products we not only reduce our cost of living but also reduce our families exposure to many carcinogenic, teteratogenic, and mutinogenic chemicals lurking in our home.

Personal care products

I make our personal care products. I have been using the Oil Cleansing Method on my face which has been FABULOUS and cleared my skin right up. More on that later. I make my own body lotion and oils, bath salts, diaper salve, eczema salve, deodorant, and have been “poo free” for 2 months now. Yes I still bathe daily but use baking soda and apple cider vinegar for my hair instead of shampoo and conditioner. My hair looks and feels great by the way! We buy hand-made goats milk bar soap from farmers markets and craft fairs for soap, which feels so decadent to me. I love it! I used to spend about $40 on personal care items, not including makeup, which cost me another $20-30 a month.

By simplifying our personal care products, and knowing exactly what is going onto my family’s body we can better control the toxins we expose our selves to. I am not sure the accuracy of this statement BUT the herbalist I worked with in Spokane mentioned that 40% of what we put onto our skin is absorbed into our body and blood stream.  The skin is the largest organ on the body after all. If you could reduce your risk simply enough wouldn’t you? More on the health benefits of cleaning up your personal care products here.

Housing expenses

We live in a smaller than necessary apartment and keep the heater between 62 and 65* on a day-to-day basis. We turn down the heat and turn off the lights when we leave the house. Our light bulbs are all CFL’s which save a lot of power usage and our water heater is at 120* unless I am tackling some stubborn diapers. We spend an average of 19% of our income on our housing expenses when the average family is at 34%. (Note that is not including the cost of our home in Spokane, which is a rental and netting $0 profit or loss at the moment).

Baby products

We cloth diaper almost all of the time. Ellie gets a rash at night, or wakes up wet in cloth so she sleeps in sposies almost every night. Other than that though we cloth diaper. If we were buying her disposables at the rate we change diapers and in the brand we use that does not cause her rashes, we would be spending an average of $90 a month, which would end up being about 1,080 a year. In Ellie’s first year of life we spent $320 on cloth diapers (that includes the very generous gift of my wonderful sister for Ellie’s baby shower), and I just bought some new-born diapers for when #2 comes for an additional $200. We are now over supplied with diapers and I will probably sell off some of my extras once we see how well we go through what we have. I spend $12 every 3-4 months on laundry detergent and the water/electric cost really is minimal with the washer and dryer, especially since we line dry during the summer. So we can call that a $59 a month savings on cloth diapering in the first year, and more for the second year into potty training, especially since half of year 2 will be spent diapering 2 kids! Good planning on our part.

And really what is cuter than a kiddo in a cloth diaper. Yeah she posed for this.

By cloth diapering we are reducing our child’s exposure to the toxic chemicals in children’s diapers. Ellie rarely gets diaper rash or yeast infections like a lot of babies I know who use disposables. I think once parents get over the learning curve of cloth diapering they will truly appreciate the health and financial benefits.

Breast Feeding

Ellie was exclusively breast fed for 6 months and is still breast fed to this day. She does not get cows milk when she is not nursing, she gets water. This saved us $1,733.75 in her first year of life alone (according to these calculations done with numbers from 2007). This is not including the cost of Organic Whole Milk we would have switched to afterward.

This cost is also not including the fact that miss Ellie has very rarely been sick enough to take to the doctor. Here is a good article about the benefits of BFing and some great links to scientific articles.

Clothes

We rarely buy new clothes for our selves, but when we do we buy quality. We never buy brand new clothes for our child unless they are on serious discount. It just seems like a waste of money for something she will grow out of quickly or destroy while playing. My MIL does buy her a new wardrobe at least twice a year because shopping for little girls is so fun. My savings tip: do not buy small children new clothes, they don’t need new clothes (unless it is a special occasion) nor do they care if they have new clothes. Let them be a little rough and tumble, creative and artsy, and have fun without worrying about staining or tearing. It will make your life much less stressful.

This is why we don’t need to destroy new clothes. 

How is this green? Re-use baby , re-use!

Transportation/vehicle expenses

We have 1 car. It is 10 years old and well maintained, most days. We own the car outright and have no monthly payments. Maintenance cost (including the big repairs spread out over the year) average about $80 a month. We spend about $80 a month on gas if I am driving a lot.  We live 5 miles away from Mike’s work and he bikes to work as weather permits, which is about 9 months out of the year. The rest of the time I give him a ride to and from work or he carpools. Bike maintenance is about $10 a month. Insurance cost is about $60 a month. That makes our transportation cost $230 a month, about 4.6% of our budget. The average American household spends 16% of their household income on transportation. It pays to drive an old car with decent mileage and only have 1 car if your situation allows.

By only driving one car we reduce our emissions by half, our gas usage by half, and our 10 year old car is just as fuel efficient as a car of the same size made this  year.

I could go on about how we save “being green” but I would love to know how you save? What are your tricks to benefiting your family and your environment by “being green”? I find the changes we have made help us support our expensive food habit and make our life much more enjoyable. I would love to hear your experiences.

Shared on Frugal Days, Sustainable Ways, and Our Simple Farm’s Simple Living Wednesday.

Got scum? Natural bathroom cleaning tips.

As you can tell from my recent post whining about my achy pregnant body I loves me a good bath soak. I HATE the filmy blegh that is left in the tub after I bathe from the oils, or after the child takes numerous baths. I also am not a big cleaner. I just don’t like to clean. The chemicals I used to use always made me cough and gag and I always felt sick afterward. I also never trusted the cleaners enough to take a bath right after using them.

After focusing on detoxifying my life as much as possible I came up with a replacement for the “normal” bath scrub I was using. It rhymes with A-hacks. I found this bath tub scrub to be safe, effective, cheap, easy to use and NON TOXIC. Plus you can bathe right afterward without feeling like you are getting cancer from the tub its self.

The recipe is really difficult… are you ready for it?

Salt (natural sea salt of course) and baking soda. I add Melaleuca essential oil to the mix too for the anti-bacterial/viral/fungal properties. It adds a nice smell too.

The combination of baking soda and salt scours the tub well and easily removes any film or build up.

Mix salt and baking soda in a 1:1 ratio and add 8 drops melaleuca essential oil per cup of mixture. Sprinkle liberally in tub, scrub-a-dub-dub and your tub is nice and shiny and clean. You can also jump right in and take a nice hot bath as a reward for your sparkly clean tub.

I use a combination of salt, Melaleuca essential oil, and lemon juice for moldy spots. Just make a paste with the ingredients, apply to the moldy areas, and scrub clean. I let the solution set for maybe a minute (I am impatient) and it usually scrubs right off with no issues.

I have a friend who has used fresh lemon on her tile grout in the shower as a cleanser, she just scrubbed it with the lemon meat and she said it came out sparkling white.

You can also make a salt and lemon juice paste and use it to buff the metal of the faucets in your house.

So many great cleaning tips in such a little blog! How do you naturally clean your bathroom?

This blog posted on the  Frugally Sustainable Blog hop

Oh my achy pregnant body.

I am almost 32 weeks pregnant. This pregnancy really has been pretty good to me up until recently. I have not thrown up at all except for when I had that horrible stomach bug that put me in the hospital. I have not gained a lot of weight, had very little swelling, and no real “scares”. It has been pretty nice compared to my extremely crappy pregnancy I had with Ellie.

Now that we are getting closer to the end my body HURTS. I have not been able to get my weekly massage because my husband has been sick for a month, and I can definitely feel it. Out of sheer desperation I remembered salt baths were supposed to ease muscle pain and it worked! I have been taking a bath with a combination of Epsom salt, Himalayan sea salts, and some oils every night and my body feels much better afterward. I have had much less pain and cramping, it stops my braxton hicks contractions that I have been having at night, and reduces the pain I feel in my hips when sleeping. My skin is softer and feels healthier than it has in a long time. And, on a side note, since I have been taking this bath nightly my CRAZY HORRIBLE pregnancy dreams/nightmares have not been occurring. I am loving this added side effect as the dreams were truly terrifying.

Ow my achy pregnant body bath:

1c Epsom Salt
1c Sea Salt (Celtic, Himalayan, Dead Sea, or “real salt”)
1/2c Baking Soda (aluminum free)
1/4-1/2c Chamomile Olive Oil Infusion
4-6 drops Lavender Essential Oil
 
Combine in hot bath water (no more than 120 degrees, you are pregnant after all), mix with hands until salt dissolves. There may be a little bit of extra graineyness, that is the extra minerals in your sea salt. Add essential oil drops right before getting into the tub to get the full benefit of the oils. If you add them too soon the bath room will smell lovely, but the oil will have evaporated before it absorbs into your skin. 
 
Enjoy your bath with a nice glass of water or tea. Soak at least 20 minutes. 
 
Be sure to clean out your bath with baking soda when you are done so the next person to use it does not slip and fall! 
 

How do these ingredients help?

Epsom salt is not actually a salt, but a naturally occurring mineral compound of magnesium and sulfate. Magnesium and sulfate are readily absorbed in the skin making bathing in it an easy way to absorb all the great health benefits. Magnesium plays many important roles in the body including enzyme regulation, reducing inflammation, improving muscle, nervous, and digestive function. Sulfate improves the absorption of nutrients, flushes toxins, and helps ease headaches.

Here is a great site I found about the benefit of Epsom salt baths. It explains things so well I feel no need to go into more detail. http://www.care2.com/greenliving/health-benefits-of-epsom-salt-baths.html?page=1

Sea Salt is different from the over processed, de-mineralized, iodized “Morton” salt you get at the grocery store. It is naturally occurring salt with the trace minerals still intact having many health benefits, which the over-processed iodized salt does not provide. If you do not know about the difference please do your research! You will be glad you did.

Sea salt is effective at stabilizing irregular heart beat and regulating blood pressure, helps extract extra acidity from your blood cells (a leading cause of inflammation), balances blood sugar levels, is vital to nervous system function, the function of blood cells, the absorption of nutrients, the clearance of lung mucous, anti histamine, anti inflammatory, prevents and eases muscle cramps, along with being an over all good provider of micro nutrients. It also is known to soften the skin. You can use extra salt as a body scrub while you are in the bath to remove excess dead skin cells. It is very relaxing, especially if you combine the salt scrub with some oil.

I have also found the natural sea salt crystals help set the “resonance” of the bath. I prefer Celtic sea salt because I feel like it grounds me better. Yes hippie dippy as my father would say but it does make a difference for me!

Baking soda helps detoxify the body, neutralizes extra acidity in the body and softens the skin. It is a huge detoxifier, and because of this I only use a 1/2 cup per bath. I have read about using a pound a bath but I don’t want that much of a detox while pregnant or breast-feeding.

The chamomile olive oil infusion is for relaxation, anti inflammatory, and calming properties. It helps reduce anxiety and insomnia, it is anti spasmodic and works to calm and relax the nerves and muscles. The oil diffuses nicely in the bath and absorbs well into the skin. I find I rarely have to use oil after the bath for extra moisturization like I do after a shower.

Lavender essential oil helps circulation, eases aches and pains, reduces cellulite,  heart palpitations, high blood pressure, reduces pain and swelling, relaxes muscles, and reduces joint pain. It is calming, uplifting, and balances emotion. It also helps with depression, insomnia, nervous tension, panic and stress. All things experienced at one time or another during pregnancy, at least from my experience.

What do you do to relax and take the pain away while pregnant?

Feeling Dirty? Make your own laundry detergent!

Caitlin guest posted before about her awesome DIY Orange Cleaner last week. It was a huge hit! I am so glad so many people are interested in using it. She also makes her own laundry detergent AND dish washer detergent. She wrote this guest post for us, and I bet, if we are really nice to her, she might help us out with dish washer detergent making some time in the future.

I am just so inspired with her simple household cleaning solutions that are green, cheap, AND simple! Thank you Caitlin! Check out her blog at Caitlin-lane.blogspot.com.

______________________________________________________

I’d like to thank Amanda for letting me guest post on her blog again! It’s always fun to hop over to other’s blogs to share a few tips and tricks.

We started cloth diapering my daughter when she was five-months-old. I had considered it before having her but my mom, who had used the old pin and rubber pants method with my older sister and brother, talked me out of it. You see, I was a Pampers baby back when cloth diapering was still (according to my mother) a huge pain in the butt. Kissing metal pins and rubber pants goodbye hadn’t been an issue for my parents.

But when we finally made that switch I was at the mercy of buying some sort of expensive laundry detergent. Yeah, yeah, I know. You don’t use that much when you wash cloth, but buying separate detergents for cloth and our clothes was beginning to add up. Plus, we were simply coating our clothes,
washer, and dryer in unneeded and unwanted chemicals. Ew. So the most logical explanation was to figure out what I could make on my own that would be best for my family. And now, no more pre-made laundry detergent laden down with chemicals and, with the aid of wool dryer balls, our clothes are
better than ever.

I need only 3 simple ingredients. Borax, washing soda, and a bar of ivory soap. I’ve heard great things about using Dr. Bronner’s soap instead and plan on giving that a go after I use up the pack of ivory soap that I have left.

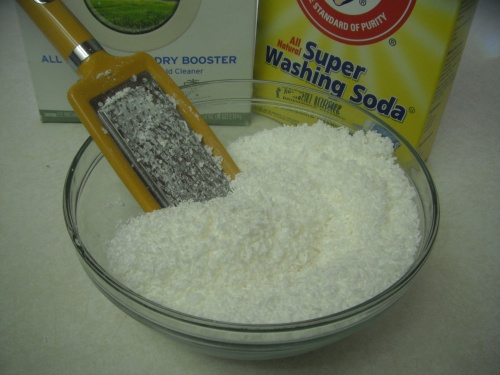
Grate up your bar of soap. This is actually 2 bars as I make a double batch at a time. If you want to be a super productive person you could probably make a butt load all at once, but I kind of enjoy making it, so I keep my batches smaller.

Now, add in the borax and the washing soda.

And shake the crap out of it until it’s fully mixed. You’re done!

I keep my detergent in an old pasta container that I never really used and use and old teaspoon from an extra set of measuring spoons to dole it out. For my diapers I use 1 tablespoon of detergent and for most other loads anywhere from 2 – 3, depending on how soiled the load is.

If your first try with this detergent doesn’t work out do not, and I repeat, do not throw your hands up in the air and say “Well this sucks!”. Every washer is different. You might have hard water or your laundry might still be loaded down with a butt load of chemicals. I don’t know, I don’t do your laundry. But when making homemade detergent there’s often tweaking involved that requires you to play with the amount of the ingredients or the ingredients themselves. I can’t even begin to tell you how long it took to get my
dishwasher detergent correct. So don’t be disheartened if this doesn’t work perfectly for you. Play with the recipe a bit until you find the perfect process that works best for you.

DIY Laundry Detergent:

Ingredients:
1 bar ivory soap
½ cup Borax
½ cup Washing Soda

Directions:
-Grate soap and place in air tight container. Add borax and washing soda, shake well.
-Before use, give either a quick shake or stir.
-Use 1 tablespoon for cloth diapers, and 2 – 3 tablespoons for other loads.

Bio:

Caitlin is a wife, a mom, and a lover of words, living on an Air Force base in the middle of nowhere. Since having her daughter she’s turned to the green side and has enjoyed the changes that eating and living well has brought her family. She also blogs at All About Growing up and Becoming a Famous Author (Caitlin-lane.blogspot.com).

Shared on Frugally Sustainable’s Frugal Days, Sustainable Ways.

Ellie’s Eczema Salve-Improved

One of my very first blogs was about an eczema salve I made for my daughter. This was one of the very first salve recipes I made and it worked pretty well. After a lot more education and practice I have modified the recipe that is much more effective, feels great, and works super well! A little bit goes a long way.

Ingredients:

1/2 c Nettle/olive oil infusion
1/4 c Plantain/olive oil infusion
1/4 c Chamomile/olive oil infusion
1/4 c Callendula/olive oil infusion
1 oz Beeswax
4 tbsp coconut oil
2 tbsp almond oil
15 drops tea tree essential oil
 

Using the double boiler method on low heat combine oil infusions (see how to make an oil infusion here: http://wp.me/p1zBYP-2u ), coconut and olive oil with the beeswax.

When the beeswax is completely melted remove from heat, add essential oil and pour into container.

While still hot you can check the consistency by dipping a metal spoon in the salve, put it in the refrigerator to cool. Once cool check for consistency. Add more beeswax for a firmer salve, or more almond oil for a softer salve.

Use liberally wherever eczema is. This is safe enough to use on the whole body and is cloth diaper safe. I tend to slather it all over dry skin too. It works like a charm.

Why these ingredients? A reminder.

These ingredients are great for any skin problem, burns, cuts, insect stings, and redness too. It is amazing! Here is the rundown of the plant properties of the plants that went in:

Beeswax: Excellent emmolient and support for moisture. Protects skin from damaging environmental factors. Anti-inflammatory, antibacterial, anti-allergenic and a germicidal antioxidant.

Coconut oil: Works well for damaged or dry skin. Works wonders for burns, cuts, rashes, bruises, and speeds healing while it fights infection. Oh, and it smells really tasty too!

Almond oil: As a dry skin treatment, almond oil relieves itchiness, soreness, rashes, dryness, irritation and burns.

Nettle oil infusion: Analgesic, anti-inflammatory, anti-allergenic, anti-dandruff, anti-histamine, astringent, noted for the treatment of infant eczema

Plantain oil infusion: Used for wounds, skin inflammations, malignant ulcers, cuts, stings and swellings and said to promote healing without scars. (Great if you have a bug bite or sting, takes the pain and sting right out!)

Calendula essential oil: Analgesic, anti-inflammatory, anti-allergenic, anti-anaphylactic,anti-rheumatic, anti-asthmatic, anti-convulsant, anti-dandruff, anti-histamine, astringent, decongestant, depurative, diuretic, haemostatic, immunomodulator, stimulating tonic

Tea Tree Essential Oil: Tea tree oil is efficacious in various dilution in treating abrasions, minor cuts, acne, arthritis, asthma, athletes foot, minor burns, chapped lips, rash from chicken pox, dandruff, dry skin, eczema, herpes lesions, warts, hives, shingles, etc.

Chamomile:  anti-inflammatory, anti-bacterial, anti-allergenic and sedative properties


Posted on Live Renewed – Your Green Resource

Cheap and easy drain cleaner

Just a quick post about how I cleared a drain last night.

Our garbage disposal has been backing up recently and in turn our dish washer has not been getting dishes very “clean”. I am loath to buy the nasty super basic, super toxic drain cleaner from the store. And honestly, $12 for a bottle of toxic goo is not first on my “to buy” list.

I always have been a fan of things that fizzle, sizzle and explode and have many fond memories playing with baking soda and vinegar. I honestly don’t know where I thought of it or heard of it first but I decided to try baking soda and vinegar for drain cleaner a while ago and loved it.


So I dumped about 2 cups of baking soda in the garbage disposal. It might have been closer to 3 cups. I buy the HUGE bag of baking soda from Costco for super cheap. Then I poured vinegar in the drain slowly. I also buy the huge bottle of white vinegar from Costco for super cheap. I let it fizz (fun) up to the top of the drain, then drain, then I added more, fizz, drain, etc

textures I saw float out of the drain were, lets call it interesting, the drain slowly cleaned out and started draining better. This did take time, about 5 whole minutes! Not as easy as pouring toxic goo and letting it sit 20 minutes, but I could use my sink after I was done without having to wait, and without the toxic fumes. Bonus.

So take your time, let it drain before you fizz again, and it works great!

How do you unclog a stubborn drain?

Orange you glad I didn’t say Windex? DIY Orange Cleaner.

I asked a good friend of mine, Caitlin, to write a guest post for me about the amazing Orange Vinegar cleanser she is using. I am so excited she is sharing it with us!

______________________________________________________

Normally I look to Amanda for advice concerning all things green and crunchy as my family is in an ever evolving process to become as green as we can be. She has given me some of the best advice and encouragement, so I’m so very excited to be able to share a little something that I do on her blog.

When my daughter first started eating food I would freak out about cleaning her high chair. It could never, ever be cleaned right before she ate, only afterwards. And then after that it had to be wiped down with water to get off any chemicals that I could.

I was so stupid.

It never occurred to me that if I was so worried about harsh chemicals that I didn’t even have to use them. I progressed to using vinegar and baking soda mixed with water and a few drops of tea tree oil in a spray bottle. It worked, but I noticed that it often left streaks or residue and I’d have to go back over it with water again anyway.

Until I discovered, dun dun dun! This!

Orange peels (or lemon or lime. Whatever floats your boat) soaked in vinegar. Miracle in a jar, folks. Especially for those of you who go through a ridiculous amount of oranges like we do. This is one of the easiest things that you can do. After you finish an orange, pop the peel into an old container and cover with vinegar. Don’t fill the vinegar to the top, only a little less than halfway as you’ll need room to add more peels. You can always add more vinegar as you go. Once it’s soaked for about two weeks it’s good to go! But if you have several jars soaking like I do (I have some more hiding under the counter) you won’t have to wait after that initial two weeks.

Here’s the easiest part. Fill a squirt bottle halfway with your orange-vinegar mixture and then top it off with water. Keep it at a 1:1 ratio, but don’t worry about measuring. I promise it’s not life or death, it’ll be OK if it’s a little off.

Spray, wipe, and enjoy the awesome smell and cleaning ability of citrus!

Bio:

Caitlin is a wife, a mom, and a lover of words, living on an Air Force base in the middle of nowhere. Since having her daughter she’s turned to the green side and has enjoyed the changes that eating and living well has brought her family. She also blogs at All About Growing up and Becoming a Famous Author (Caitlin-lane.blogspot.com).


Shared on Frugal Days Sustainable Ways. 

Diaper Salve-For the angry baby butt

This is just a quick post about the diaper salve I make for Ellie. It works great, is all natural and is anti bacterial, viral and fungal. Yes it kills fungus. Thank you tea tree oil! And as an added bonus, you can use it with cloth diapers!

1/2 cup Plantain infused olive oil
1/4c Nettle infused olive oil
1/4 Callendula infused olive oil (You can also use chamomile in a pinch)
1 oz of bees wax.

Melt together on low heat with the double boiler method. The bees wax melts faster and more evenly if you grate it on the cheese grater first. The flakes melt nice and evenly. Remove from heat.

Add

20 drops tea tree (Melaleuca) Essential oil,
20 drops Lavender Essential oil
10 drops Callendula Essential oil.

Pour in container and let solidify. If you want it a little creamyer add 1/2 cup coconut oil, 1/2 oz bees wax instead.

Apply liberally to baby’s bum as needed for rash. Enjoy!

For how to make an herb infused oil see http://wp.me/p1zBYP-2u

This cream also works well on baby (and mommy’s) dry skin in a pinch.

Itchy Dog Oil: Oil for the itchy dog.

*This is not intended as medical or veterinary advice. Please consult your vet if your pet has any persistent or concerning problems.*

My parents have a dog named Baby. Baby has a nasty skin issue that “looks like elephant skin”, which he is pretty sure is caused by allergies. He chews on him self because he is super itchy and this chewing is causing Baby to get fungal and bacterial skin infections. His skin on his belly and parts of his chest are black because of skin damage he has from these persistent allergies. The vet has my parents giving him benedryl once or twice a day to help with the allergies, antibiotics for the bacteria, and a topical cream for the fungus. They have given him steroids, cortisone and all sorts of other stuff as needed too. Poor Baby just has it bad.

They are visiting this week and poor baby is so itchy! I felt so bad for him I mad him a itchy skin oil to help relieve some of the irritation. I don’t have any books about using oils on dogs so I used the same philosophy as I do with people. 40% of anything that comes into contact with your skin absorbs into your body, so I will not put anything on my skin that would hurt or injure me internally. I also did not choose anything that could be harmful to the dog unless he had an allergy to the ingredients.  I did a spot test on the dog skin a day before applying the oil over all his parts to check for redness and irritation. I would suggest doing this on anyone with sensitivities.

In the oil (10 oz container) I put:

4.5 oz Nettle infused olive oil

4.5 oz Plantain infused olive oil

40 drops Lavender essential oil

40 drops Tea Tree essential oil

40 drops Calendula essential oil

Apply the oil with clean cotton pads or balls, never double dipping in the oil. Always use a new cotton ball for every new area of application. Apply liberally to the effected aria (after spot testing to check for allergic reaction).


The reasons I chose these ingredients:

Nettle oil: Anti-Inflamitory,  very effective in scalp related problem like scaly scalp (dandruff) and psoriasis, increases blood circulation, great tonic to revitalize body, organ functioning and blood purification.

Plantain oil: used for bruises, bug bites, swellings, scarring, strained ligaments, muscles or tendons, rashes and skin irritations. Plantain is often used as a drawing agent, to draw out thorns, splinters or other foreign material.

Lavender essential oil:  lavender helps abscesses, acne, allergies, athlete’s feet and fungal infections, boils, bruises, burns, cold sores, cuts, dermatitis, eczema, hives, inflammations, insect bites, lice, psoriasis, rashes, ringworm, scabies, scars, shingles, stretch-marks, sunburns, and wounds.

Calendula essential oil: Good for dry and damaged skin, skin inflammations, rashes, diaper irritations, and other skin disorders.

Melaleuca (Tea Tree) essential oil: Disinfectant, acne treatment, bug bites, repells lice and ticks, dandruff, minor cuts, scrapes bruises. Antibacterial, anti fungal and antiviral properties have been found in various studies as well.


If I had other ingredients I would have also liked to use chamomile essential oil for the calming properties and vitamin E for a preservative and skin benefits but I did not have these handy. After three days of application the oil seems to help calm Baby’s itchiness and his black area seems to be lightening up in places. This calming healing oil seems to be helping. We have been applying the oil once a day to his belly, chest (he has a bald spot where he rubs a lot), on his paws and on the outside of his ears. I would like it applied twice a day but it doesn’t seem to be happening. That is life!

Did this help? I will post pictures and follow up as the use continues. I think it is reducing the blackness on his belly but we will have to wait and see with comparison photos. I will see my parents and their dog again in about two weeks after Thanksgiving.


How to make a herb/oil infusion

I was explaining to someone how I make Ellie’s Butt Salve and I mentioned herbal oil infusions. One of the gals I was talking to didn’t know how to make one so I figured I would write it all out and add pictures.

There are two ways to make herb infused oils. If you have fresh herbs you can use both ways but if you have time the way that is most recommended is to get a glass jar, (mason jar, or re-use a pickle jar, jam, whatever is glass really), and get the herb you would like an oil infusion of, (I have chamomile, plantain, nettle, comphrey, and will make ginger shortly), and some olive oil. Cold pressed is always best but you do not want to use extra virgin. Get the cheap second or third press of olive oil instead. One of my instructors said it actually has more benefit to the body and does not go rancid as quickly.

*Since writing this I have taken another class that recommends using extra virgin olive oil because of its purity and having a similar PH as human skin. The more classes I take the more I realize these things really are a personal preference.

Take your herbs and chop them up. The herb you are using will depend on what part of the plant to use. With infusions it is usually fine to use the whole plant but some parts of the plant have more medicinal benefit and beneficial oils in certain parts.

Put the herb chopping in the jar as full and well packed as you can. Pour olive oil over the herbs completely covering all of the plant material. The lack of air exposure is what will keep your herbs from not rotting so make sure you cover your plant matter completely! Get a wood stick (I use chopsticks), tongue depresser or something to run along the inside of the jar gently removing air bubbles from around the plant matter. Put a piece of cheese cloth over the top of the jar with a rubber band and let it sit in a cool dry place (I kept mine on a shelf in the mud room) for 6-8 weeks. You leave the jar open to air with fresh herbs so the water from the herb can escape the oil and not turn the oil rancid.  Invert jar a few times a day to make sure the herbs are always covered with oil.

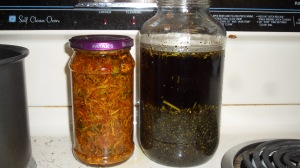
callendula and plantain in a jar

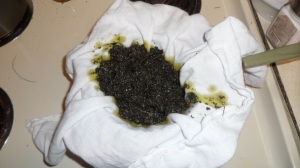
Strain the oil into a container using the cheese cloth and squeeze out all of the oil from the plant material. When you squeeze out the oil at the end you will get some very beneficial oils so don’t be lazy, squeeze it good! Cap and label the oil (ex. Chamomile infused in olive oil) and store in cool dark dry place and use as needed.

This method only works with fresh herbs. It will not work with dry herbs so do not try it! It will just be a waste of your supplies and make you sad.

Straining plantain

The other way is with heat. This method can be used with fresh or dry herbs depending on the season and what you have. Your oil will not be as potent but it still works pretty darn well if you ask me. This is the method I use when I procrastinate or need a new oil quickly.

Get your herbs and olive oil and prepare as stated above. You can put the herbs either in a glass jar, like a mason jar, or a glass bowl, (I use a pyrex measuring cup, It can handle heat and the handle hooks onto the side of a pan easily and makes everything work wonderfully).

Get a sauce pan and add water. Set the pyrex into the pan with the handle hooked over the side making sure that the water level is not high enough to get into the pyrex when the water is boiling. (You don’t want extra water in your oil). This is called a double boiler method. Add herbs to the pyrex container and pour in oil. Turn on heat to the pan on medium low and let the water boil on low for 2-4 hours. You will have to add water as the water in the pan boils off. The longer you let it warm and infuse the more potent the oil will be. Refill water in pan as needed to maintain boiling and not to dry out pan (yeah I did that).

When the oil is well infused get a glass jar/measuring cup and a small mesh strainer, put cheese cloth inside the strainer and pour the oil through that into the jar. Once the remaining herbs cool enough squeeze the hell out of that cheesecloth and herbs (as said above) to get all those good lingering oils out. Enjoy your oil and store in a cool dry place for up to  a year. This oil can be used immediately and does not have to sit and wait.

You can also do the heat method with dried herbs in mason jars covered with olive oil in a very low heat crock pot (do not let the heat get over 100 degrees) or yogurt maker. In a crock pot do a double boiler method for 4-6 hours. Most crock pots get too hot, even on low setting, and will cook/fry your herbs leaving the oil with a cooked smell that is not pleasant. I am not a fan of this method. Yogurt makers maintain a lower level heat so using the double boiler method with mason jars leave the oil in the yogurt maker for 4 days, shaking twice a day. I have never tried this but it is in my medicine making book so I thought I would share.

Was that helpful? I hope so! How do you infuse your oils? What is your favorite oil to use?